at flash.display::Stage/set displayState()
Programe Note/FLEX_AIR
- [FLEX] 브라우져 풀스크린 모드 전환 2009.04.14
- ActionScript 3.0 Code 라이브러리 모음 2009.04.07
- [펌]Tree에 바인딩 된 XML의 특정 attribute로 아이템을 검색하고 폴더 확장하기 2009.04.06 1
- [FLEX] 현재 날짜 구하기 2009.04.03
- [FLEX3] 스프링프레임워크(SpringFramework)와 플렉스(BlazeDS)를 연동한 간단예제4 - 클라이언트단구현 2009.03.31 1
- [FLEX3] 스프링프레임워크(SpringFramework)와 플렉스(BlazeDS)를 연동한 간단예제3 - 서버단구현2 2009.03.31
- [FLEX3] 스프링프레임워크(SpringFramework)와 플렉스(BlazeDS)를 연동한 간단예제2 - 서버단구현1 2009.03.31
- [FLEX3] 스프링프레임워크(SpringFramework) + 플렉스(BlazeDS)를 연동한 간단예제1 - 셋팅 2009.03.31
- Flex3(eclipse 3.3 plugIn ver.) + BlazeDs 첫 통신! 2009.03.31
- BlazeDS 참고 사이트 2009.03.30
[FLEX] 브라우져 풀스크린 모드 전환
at flash.display::Stage/set displayState()
ActionScript 3.0 Code 라이브러리 모음
Adrian Parr’s Blog 에 올라온 ActionScript 3.0 Code 라이브러리 모음이다. 매우 유용해서 긁어왔다.
3D Engines
- Papervision3D
http://blog.papervision3d.org/ - Away 3D
http://www.away3d.com/
- Sandy 3D
http://www.flashsandy.org/
- Alternativa Platform
http://blog.alternativaplatform.com/en/
- FIVe3D
http://five3d.mathieu-badimon.com/
- WireEngine3D (we3d) - A lightweight and fast 3D Engine for Flash 8/9.
http://osflash.org/we3d/
- Sharikura
http://temp.roxik.com/datas/physics/
3D Game Engines
- PaperWorld 3D
http://paperworld3d.com/
3D Animation Framework
- Cast3D
http://www.cast3d.org/
3D Physics Engines
- WOW-Engine
http://seraf.mediabox.fr/wow-engine/
Animation Tweening Kits
- Tweener - A class for creating tweens in actionscript 2 and 3 - because there’s infinity between 0 and 1.
http://code.google.com/p/tweener/
- TweenLite
http://blog.greensock.com/tweenliteas3/
- TweenMax
http://blog.greensock.com/tweenmaxas3/
- Tweensy
http://www.lostinactionscript.com/blog/index.php/2008/08/31/as3-tween-engine-tweensy-preview/
- GoASAP (ActionScript Animation Platform)
http://www.goasap.org/
- AS3 Animation System 2.0
http://www.boostworthy.com/blog/?p=170
- Animation Package
http://www.alex-uhlmann.de/flash/animationpackage/
- KitchenSync - KitchenSync is an ActionScript 3.0 library for sequencing animations and other time-based actions.
http://code.google.com/p/kitchensynclib/
- Gyro - A tween and animation library for ActionScript 3
http://code.google.com/p/gyro-actionscript-animation/
- gTween
http://www.gskinner.com/blog/archives/2008/08/gtween_a_new_tw.html
- HydroTween + HydroSequence (based on GoASAP)
http://blog.hydrotik.com/2008/07/19/hydrotween-hydrosequence-rev32/
- AS3 Easing
http://www.uza.lt/codex/as3-easing/
- Twease
http://code.google.com/p/twease/
2D Physics Engines
- APE (Actionscript Physics Engine)
http://www.cove.org/ape/index.htm
- Box2DFlashAS3
http://box2dflash.sourceforge.net/
- FOAM - 2D Rigid Body Physics Engine
http://code.google.com/p/foam-as3/
- glaze - 2D Rigid Body Dynamics & Game Engine for Actionsctipt 3
http://code.google.com/p/glaze/
- motor2
http://lab.polygonal.de/motor_physics/
- Fisix Engine
http://www.fisixengine.com/default.asp
- PopShapes
http://lab.andre-michelle.com/physics-engine/
Security
- AS3Crypto
http://crypto.hurlant.com/
Audio Libraries
- Popforge - ActionScript 3 code sandbox for various packages
http://code.google.com/p/popforge/
Particle Systems
- FLiNT
http://flintparticles.org/
- Partigen (Not free)
http://desuade.com/products/partigen/ - Pulse Particle System - A general purpose AS3 particle system.
http://www.rogue-development.com/pulseParticles.html - Emitter - ActionScript 3.0 particle FX engine
http://code.google.com/p/emitter/
Data Visualization
- Flare - Create interactive data visualizations for the web
http://flare.prefuse.org/
Loading Kits
- BulkLoader - A library for managing multiple loadings with Actionscript 3 (AS3).
http://code.google.com/p/bulk-loader/
- Masapi
http://code.google.com/p/masapi/
- QueueLoaderAS3
http://code.google.com/p/queueloader-as3/ - SomaLoader
http://www.soundstep.com/blog/downloads/somaloader/
OOP Frameworks
- Cairngorm
http://opensource.adobe.com/wiki/display/cairngorm/Cairngorm
- PureMVC
http://puremvc.org/
- Mate
http://mate.asfusion.com/
- Gaia
http://www.gaiaflashframework.com/
- Slide
http://code.google.com/p/flex-slide/
- Guasax
http://www.guasax.com/
- VEGAS
http://code.google.com/p/vegas/
- Parsley
http://www.spicefactory.org/parsley/
- LowRa - AS3 version of pixlib
http://code.google.com/p/lowra/ - CASA Lib - An Open Source Code Library for ActionScript 2.0 & 3.0
http://casalib.org/
Other APIs and libraries
- facebook-actionscript-api - Actionscript API for the Facebook platform
http://code.google.com/p/facebook-actionscript-api/
- as3facebooklib - ActionScript 3.0 API for Facebook
http://code.google.com/p/as3facebooklib/
- Yahoo Maps API
http://developer.yahoo.com/flash/maps/
- corelib - ActionScript 3.0 library for several basic utilities (JPEG Encoding, MD5 Hashing, JSON Serialization).
http://code.google.com/p/as3corelib/
- as3flexunitlib - ActionScript 3.0 framework for unit testing.
http://code.google.com/p/as3flexunitlib/
- as3flickrlib - ActionScript 3.0 API for Flickr
http://code.google.com/p/as3flickrlib/
- as3mapprlib - ActionScript 3.0 API for Mappr
- http://code.google.com/p/as3mapprlib/
- as3syndicationlib - ActionScript 3.0 library for handling syndication feeds.
http://code.google.com/p/as3syndicationlib/
- as3odeolib - ActionScript 3.0 API for Odeo
http://code.google.com/p/as3odeolib/
- as3youtubelib - ActionScript 3.0 API for YouTube
http://code.google.com/p/as3youtubelib/
- as3ebaylib - ActionScript 3.0 API for eBay
http://code.google.com/p/as3ebaylib/
- as3awss3lib - ActionScript 3.0 library for interacting with Amazon S3
http://code.google.com/p/as3awss3lib/
- as3soundeditorlib - Actionscript 3.0 library for sound playback, spectrum display, and cue point display
http://code.google.com/p/as3soundeditorlib/
- as3ds - AS3 Data Structures For Game Developers
http://code.google.com/p/as3ds/
- as3notificationlib - A notification framework written in AS3 for the Adobe Integrated Runtime (AIR)
http://code.google.com/p/as3notificationlib/
- as3preferenceslib - An AIR library for storing preferences
http://code.google.com/p/as3preferenceslib/
- as3nativealertlib - An AIR alert that appears in a native window
http://code.google.com/p/as3nativealertlib/
- ASCOLLADA - actionscript library for parsing Collada files
http://code.google.com/p/ascollada/
- FZip - An Actionscript 3 class library to load, modify and create standard ZIP archives.
http://codeazur.com.br/lab/fzip/
- lastfm-as3 - Actionscript 3.0 API to access the Last.fm web services
http://code.google.com/p/lastfm-as3/
- MapQuest
http://company.mapquest.com/mqbs/4a.html
- Modest Maps - A display and interaction library for tile-based maps in Flash
http://www.modestmaps.com/
- as3cards - An ActionScript 3.0 card engine and example games
http://code.google.com/p/as3cards/
- flexircclient - ActionScript 3 based IRC library
http://code.google.com/p/flexircclient/
- AsWing - A GUI framework and library that allows programmers to make their flash application(or RIA) UI easily.
http://www.aswing.org/
- as3httpclient - ActionScript 3 utils/classes to extend HTTP/HTTPS APIs in Flash Player 9 (onwards)
http://code.google.com/p/as3httpclient/
- DistortionTweener
http://evolve.reintroducing.com/2007/11/18/as3/as3-distortiontweener/
- ascanvas - An adapter of HTML Canvas and fl.display.Graphics
http://code.google.com/p/ascanvas/
- dopplr-as3 - actionscript 3 code for accessing data from dopplr.com’s api
http://code.google.com/p/dopplr-as3/
- FC64 - an Open-Source Commodore 64 Emulator
https://mirror1.cvsdude.com/trac/osflash/fc64/
- FFilmation - AS3 Isometric Engine
http://www.ffilmation.org/website/
- Google Maps API
http://code.google.com/apis/maps/documentation/flash/intro.html
- FVNC - VNC Client for Flash Player 9 and above
http://osflash.org/fvnc
- AS3 Parametric Curve Library
http://www.algorithmist.net/as3pc.html
- AWI - AMFPHP-WordPress Integration
http://www.klr20mg.com/awi/ (in Spanish) - as3webservice - Open-source Webservice class implementation in AS3 for Flash CS3 IDE
http://code.google.com/p/as3webservice/
- as3jayrock - AS3 wrapper for Jayrock communication
http://code.google.com/p/as3jayrock/ - ASAP Library - A library for the development of maintainable, multi-movie, interactive applications.
http://asaplibrary.org/
[펌]Tree에 바인딩 된 XML의 특정 attribute로 아이템을 검색하고 폴더 확장하기
Tracy Spratt <tspratt@lariatinc.com> 의 아이디어입니다
<?xml version="1.0" encoding="utf-8"?>
<!-- Tree control example. -->
<mx:Application xmlns:mx="http://www.adobe.com/2006/mxml" creationComplete="initApp()">
<mx:Script><![CDATA[
[Bindable]
public var _xmlData:XML;
public function initApp():void
{
_xmlData = <element eid="hello">
<element eid="world">
<element eid="123"/>
<element eid="graham"/>
<element eid="weldon">
<element eid="office">
<element eid="thing"/>
<element eid="boat"/>
<element eid="chair"/>
</element>
<element eid="person"/>
</element>
</element>
</element> ;
}//initapp
private function expandParents(xmlNode:XML):void
{
while (xmlNode.parent() != null) {
xmlNode = xmlNode.parent();
myTree.expandItem(xmlNode,true, false);
}
}//expandParents
private function findNodeById(sId:String):void
{
var xmllistDescendants:XMLList = _xmlData.descendants().(@eid == sId);
expandParents(xmllistDescendants[0]);
myTree.selectedItem = xmllistDescendants[0];
}//findNodeById
]]></mx:Script>
<mx:Panel title="Tree Control Example" height="75%" width="75%"
paddingTop="10" paddingLeft="10" paddingRight="10" paddingBottom="10">
<mx:HBox>
<mx:TextInput id="tiId" text="boat" />
<mx:Button label="Find" click="findNodeById(tiId.text)" />
</mx:HBox>
<mx:Tree id="myTree" width="50%" height="100%" labelField="@eid"
showRoot="false" dataProvider="{_xmlData}" />
</mx:Panel>
</mx:Application>
[FLEX] 현재 날짜 구하기
아래 코드를 좀 응용하면 될듯...
var sday:String = nowDate.date.toString();
var smonth:String = (nowDate.month+1).toString();
if(sday.length == 1){
sday = "0"+sday;
}
if(smonth.length == 1){
smonth = "0"+smonth
}
snowDate = nowDate.fullYear.toString()+"-"+ smonth +"-"+sday;
[FLEX3] 스프링프레임워크(SpringFramework)와 플렉스(BlazeDS)를 연동한 간단예제4 - 클라이언트단구현
<< service-config.xml파일을 수정 >>
<factory id="springfactory" class="flex.messaging.factory.SpringFactory" />
</factories>
<< remote-config.xml 파일을 수정 >>
<properties>
<factory>springfactory</factory>
<source>productManager</source>
</properties>
</destination>
자세히 보시면 factory는 위에 service-config.xml파일에 정의한 놈이고, source는 bean이름입니다.
즉 applicationContext.xml파일에 정의한 그 bean이름을 저기에 적어 놓으면 됩니다.
그러면 그 bean을 flex로 가져와서 쓸 수 있습니다.
아 그리고 프로젝트에서 이상하게 contextroot가 WebContent로 되어있는데 프로젝트이름으로 고쳐줍시다-_-;
context root를 프로젝트이름(SpringAndBlazeds)으로 바꿔줍시다.

<< FLEX 작성 >>
자 그러면 flex_src에 있는 SpringAndBlazeds.mxml을 수정해봅시다.
SpringAndBlazeds.mxml
<?xml version="1.0" encoding="utf-8"?>

<mx:Application xmlns:mx="http://www.adobe.com/2006/mxml" layout="absolute"

 applicationComplete="init();">


 <mx:Script>

  <![CDATA[

   import mx.controls.Alert;

   import mx.rpc.events.FaultEvent;

   import mx.rpc.events.ResultEvent;

   import mx.rpc.remoting.RemoteObject;


   private function init():void {

    var remoteObject:RemoteObject = new RemoteObject();

    remoteObject.destination = "productmanager";

    remoteObject.addEventListener(ResultEvent.RESULT, resultHandler);

    remoteObject.addEventListener(FaultEvent.FAULT, faultHandler);

    remoteObject.getProducts();

   }


   private function resultHandler(event:ResultEvent):void{

       dg.dataProvider = event.result;

      }


      private function faultHandler(event:FaultEvent):void{

       Alert.show("실패 메세지 : " + event.fault.message);

      }

  ]]>

 </mx:Script>


 <mx:DataGrid id="dg" width="100%" height="100%" />

</mx:Application>
간단하게 Manager에 있는 getProducts를 호출해서 DataGrid에 넣는 코드입니다.
<< 실행 >>
이클립스 오른쪽아래에 server에다가 SpringAndBlazeds프로젝트를 추가합니다.
서버에 대고, 오른쪽버튼누르면, Add and Remove Project클릭해서 추가하면 됩니다.
서버를 가동합니다.
Run Flex Application을 실행해봅시다!

- Spring 프레임워크의 부족한 점 보안
- Flex에서 DataBase의 연동시 처리 방법 보안
- iBatis의 데이터 베이스 정의 및 사용방법 보안
[FLEX3] 스프링프레임워크(SpringFramework)와 플렉스(BlazeDS)를 연동한 간단예제3 - 서버단구현2
package springapp.service;


import java.util.List;

import springapp.domain.Product;


public interface ProductManager {

 public List<Product> getProducts();

}
package springapp.service;


import java.util.List;


import springapp.dao.ProductDao;

import springapp.domain.Product;


public class ProductManagerImpl implements ProductManager {


 private ProductDao productDao;


 @Override

 public List<Product> getProducts() {

  return productDao.getProductList();

 }


 public void setProductDao(ProductDao productDao) {

  this.productDao = productDao;

 }

}
getProducts라는 함수는 Dao에서 getProductList를 호출하는 놈이네요.
요 아래에는 setter가 있네요. 이건 spring에서 DI를 하기위해 존재하는 setter입니다^^
서비스도 완성이 되었네요! 이제 설정파일을 작성해봅시다.
WEB-INF/applicationContext.xml
<?xml version="1.0" encoding="UTF-8"?>

<beans xmlns="http://www.springframework.org/schema/beans"

 xmlns:xsi="http://www.w3.org/2001/XMLSchema-instance"

 xmlns:p="http://www.springframework.org/schema/p"

 xmlns:aop="http://www.springframework.org/schema/aop"

 xmlns:tx="http://www.springframework.org/schema/tx"

 xsi:schemaLocation="http://www.springframework.org/schema/beans

 http://www.springframework.org/schema/beans/spring-beans-2.5.xsd

 http://www.springframework.org/schema/aop

 http://www.springframework.org/schema/aop/spring-aop-2.5.xsd

 http://www.springframework.org/schema/tx

 http://www.springframework.org/schema/tx/spring-tx-2.5.xsd">


 <!-- Enable @Transactional support -->

 <tx:annotation-driven />


 <!-- Enable @AspectJ support -->

 <aop:aspectj-autoproxy />


 <aop:config>

  <aop:advisor pointcut="execution(* *..ProductManager.*(..))"

   advice-ref="txAdvice" />

 </aop:config>


 <tx:advice id="txAdvice">

  <tx:attributes>

   <tx:method name="save*" />

   <tx:method name="get*" read-only="true" />

  </tx:attributes>

 </tx:advice>


 <bean id="productManager"

  class="springapp.service.ProductManagerImpl">

  <property name="productDao" ref="productDao" />

 </bean>


</beans>
Dao부분의 설정파일인 applicationContext-ibatis.xml파일을 봅시다.
WEB-INF/applicationContext-ibatis.xml
<?xml version="1.0" encoding="UTF-8"?>

<beans xmlns="http://www.springframework.org/schema/beans"

 xmlns:xsi="http://www.w3.org/2001/XMLSchema-instance"

 xmlns:p="http://www.springframework.org/schema/p"

 xmlns:aop="http://www.springframework.org/schema/aop"

 xmlns:tx="http://www.springframework.org/schema/tx"

 xsi:schemaLocation="http://www.springframework.org/schema/beans

 http://www.springframework.org/schema/beans/spring-beans-2.5.xsd

    http://www.springframework.org/schema/aop

    http://www.springframework.org/schema/aop/spring-aop-2.5.xsd

    http://www.springframework.org/schema/tx

    http://www.springframework.org/schema/tx/spring-tx-2.5.xsd">


 <bean id="propertyConfigurer"

  class="org.springframework.beans.factory.config.PropertyPlaceholderConfigurer"

  p:location="classpath:properties/jdbc.properties" />


 <bean id="dataSource"

  class="org.springframework.jdbc.datasource.DriverManagerDataSource"

  p:driverClassName="${jdbc.driverClassName}" p:url="${jdbc.url}"

  p:username="${jdbc.username}" p:password="${jdbc.password}" />


 <!-- Transaction manager for iBATIS Daos -->

 <bean id="transactionManager"

  class="org.springframework.jdbc.datasource.DataSourceTransactionManager">

  <property name="dataSource" ref="dataSource" />

 </bean>


 <!-- SqlMap setup for iBATIS Database Layer -->

 <bean id="sqlMapClient"

  class="org.springframework.orm.ibatis.SqlMapClientFactoryBean">

  <property name="dataSource" ref="dataSource" />

  <property name="configLocation"

   value="classpath:springapp/dao/SqlMapConfig.xml" />

 </bean>


 <!-- Add additional Dao definitions here -->

 <bean id="productDao"

  class="springapp.dao.ProductDaoImpl">

  <property name="sqlMapClient" ref="sqlMapClient" />

 </bean>


</beans>
jdbc.properties파일은 properties라는 package를 만들고, jdbc.properties파일을 넣어버립시다.
jdbc.driverClassName=com.mysql.jdbc.Driver

jdbc.url=jdbc:mysql://DB주소

jdbc.username=DB아이디

jdbc.password=DB비밀번호
이 설정들의 bean들의 관계를 보고 싶다면-_-;
Spring Elements에서 오른쪽버튼 클릭하고 properties를 선택.
Bean Support를 선택, Add한 뒤 두개의 설정파일(applicationContext.xml, applicationContext-ibatis.xml)선택.
Config set에서 New하고 Name에 applicationContext라고 하고, 두개다 체크 오케이~
그럼 이제 스프링 설정파일에서 에러를 찾아낼 수 있어요!
bean들의 관계를 그래프로도 볼 수 있네요!
Config set에 추가한 applicationContext에다가 마우스오른쪽버튼을 클릭하면 open graph로 볼 수 있어요!
이제 클라이언트 구현으로....다음 시간에-_-;
[FLEX3] 스프링프레임워크(SpringFramework)와 플렉스(BlazeDS)를 연동한 간단예제2 - 서버단구현1
`id` int(11) NOT NULL,

설정파일은 applicationContext.xml과 applicationContext-ibatis.xml 두개를 사용할껍니다.

Java Resources:src에다가 New를 하고 class를 선택합니다.
package는 springapp.domain이라고 하구요.
Name은 Product라고 하고 Finish

package springapp.domain;


public class Product {


 private int id;

 private String description;

 private Double price;


 public int getId() {

  return id;

 }


 public void setId(int id) {

  this.id = id;

 }


 public String getDescription() {

  return description;

 }


 public void setDescription(String description) {

  this.description = description;

 }


 public Double getPrice() {

  return price;

 }


 public void setPrice(Double price) {

  this.price = price;

 }

}Java Resource:src에 New해서 interface를 추가합시다.
package에다가 springapp.dao라고 써놓고,
Name에다가 ProductDao라고 씁시다.
package springapp.dao;


import java.util.List;

import springapp.domain.Product;


public interface ProductDao {

 public List<Product> getProductList();

}저 Dao인터페이스를 구현해봅시다!!!
package springapp.dao;


import java.util.List;


import org.apache.commons.logging.Log;

import org.apache.commons.logging.LogFactory;

import org.springframework.orm.ibatis.support.SqlMapClientDaoSupport;


import springapp.domain.Product;


public class ProductDaoImpl extends SqlMapClientDaoSupport implements

  ProductDao {


 protected final Log logger = LogFactory.getLog(getClass());


 @SuppressWarnings("unchecked")

 @Override

 public List<Product> getProductList() {

  logger.info("Getting products!");

  return getSqlMapClientTemplate().queryForList("getProductList");

 }

}
<?xml version="1.0" encoding="UTF-8" ?>


<!DOCTYPE sqlMapConfig

    PUBLIC "-//ibatis.apache.org//DTD SQL Map Config 2.0//EN"

    "http://ibatis.apache.org/dtd/sql-map-config-2.dtd">


<sqlMapConfig>

 <typeAlias alias="Product" type="springapp.domain.Product"/>


 <sqlMap resource="springapp/dao/MySQLProduct.xml" />

</sqlMapConfig>
alias지정해주고, resource는 src/springapp/dao/MySQLProduct.xml파일입니다.
MySQLProduct.xml
<?xml version="1.0" encoding="UTF-8" ?>


<!DOCTYPE sqlMap

    PUBLIC "-//ibatis.apache.org//DTD SQL Map 2.0//EN"

    "http://ibatis.apache.org/dtd/sql-map-2.dtd">


<sqlMap namespace="Product">


 <resultMap id="ProductMap" class="Product">

  <result property="id" column="id" />

  <result property="description" column="description" />

  <result property="price" column="price" />

 </resultMap>


 <select id="getProductList" resultMap="ProductMap">

  select id, description, price from products

 </select>


</sqlMap>
getProductList라는 것은 products테이블에서 내용을 select하는 것이네요.
Dao가 완성되었네요! 너무 길어지니 다음이시간에 ...
[FLEX3] 스프링프레임워크(SpringFramework) + 플렉스(BlazeDS)를 연동한 간단예제1 - 셋팅
http://www.adobe.com/cfusion/tdrc/index.cfm?product=flex_eclipse
http://www.igenko.org/archiva/repository/igenko/com/adobe/flex/blazeds-spring/
Application Type : Web Application


Integration에서 Spring IDE AJDT Intergration 체크해제
AspectJ Development Tools도 설치하려면 하면된다. 난 사용할줄 모름...
Next -> agree -> finish하면 설치가 됩니다.
설치가 다 되면 이클립스ide를 restart하라고 나와서 리스타트^^

Flex3(eclipse 3.3 plugIn ver.) + BlazeDs 첫 통신!
아래 글은 투윙오리(happyyhj)님의 블로그에서 퍼왔음을 알려드립니다.
원본 주소 : http://blog.naver.com/happyyhj/59943609
문제가 있을시 삭제처리 하겠습니다.
===================================================================================================
Flex2에서 할려고 했었는데 BlazeDs는 Flex3에서만 된다기에 그냥 Flex3에서 함.
이클립스에서 몽땅 다 사용하기 ㅋ
예제들을 보니 거의 플렉스 빌더(flex) + 이클립스(BlazeDs) 이렇게 사용하고 있었다.
고맙게도 어떤 분께서 이렇게 좋은 자료를 올려주셔서 보면서 따라했다.
안에 내용은 중복된다. 그냥 저거 그대로 했다고 보면 된다.
친절한 설명과 함께 그림으로도 과정샷을 설명해주신 내용을 파일로 다운받을 수 있도록
해놓으셨다. 완전 감사!
http://tong.nate.com/thesunrises/45999746
[준비작업]
1. BlazeDS를 다운 받는다.
(Binary Distribution-> 꼭 필요한 파일만 있음.
샘플이랑 바로 구동해 볼 수 있는 톰캣 포함을 원하면 Turnkey)
http://opensource.adobe.com/wiki/display/blazeds/Release+Builds
2. 다운 받은 압축 파일을 풀면 blazed.war 파일이 있다. 확인해 보자.
< 시작 >
1. 이클립스 띄워서 플렉스3 프로젝트 생성(New-> FlexProject)
아래 그림과 같이 셋팅한다.
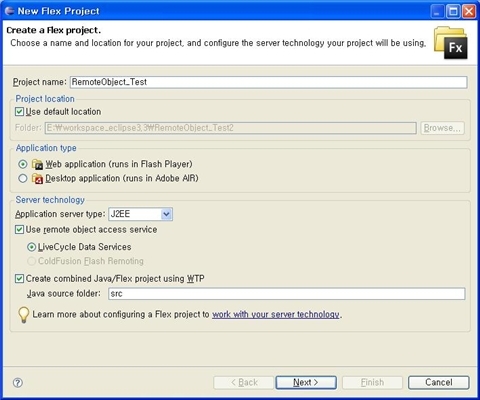
[Next]!
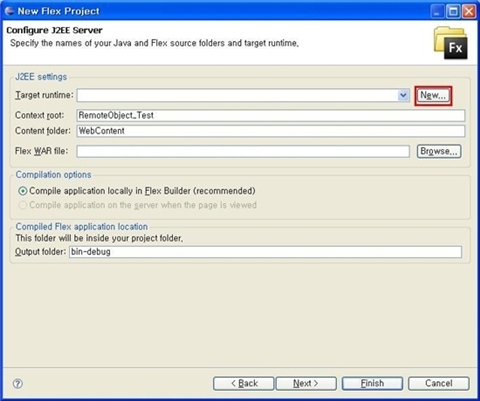
2. 1에서 서버타입으로 선택한 J2EE Server 셋팅작업
콤보박스 내렸을 때 기존에 내가 등록한게 있으면 그거 선택하고
없으면 [New...]버튼 클릭
3. 나는 톰캣 5.5 사용 ^^ -> [Installed Runtimes] 버튼 클릭
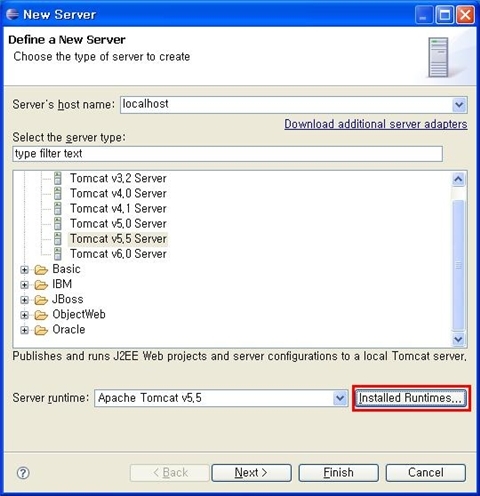
4. [Add...] 버튼 클릭 후
톰캣 5.5 클릭 후 [Next] 버튼 클릭
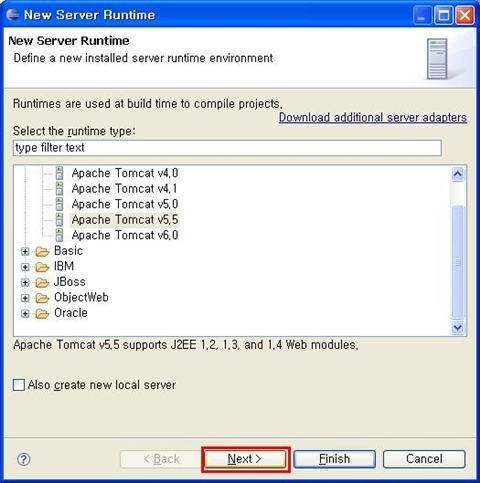
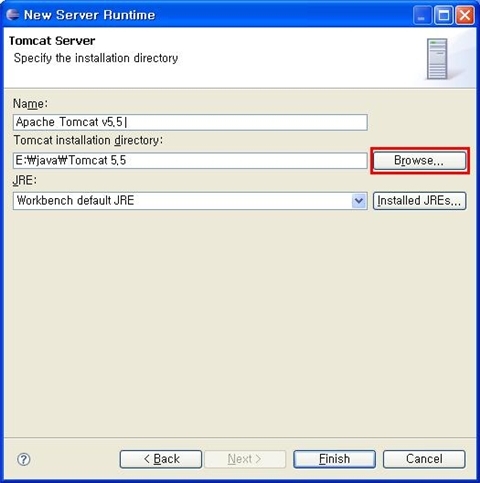
5. [Browse...] 버튼 클릭해서 내가 설치해 놓은 톰캣 폴더 경로 잡아준다.
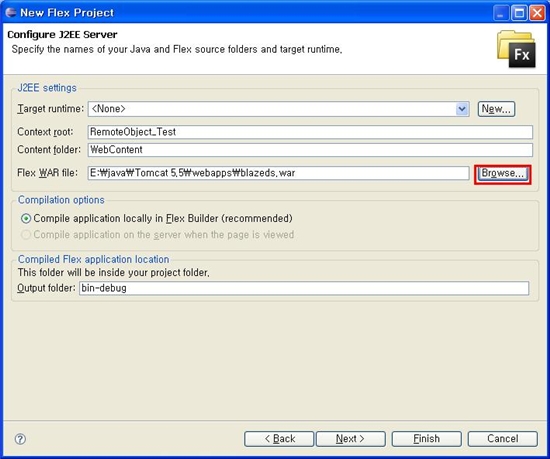
6. 다시 2번의 창으로 돌아와서 [Browse...]버튼 클릭 해서 아까 준비작업 1에서 다운 받았던 blazed.was파일이 있는 경로를 잡아준다.
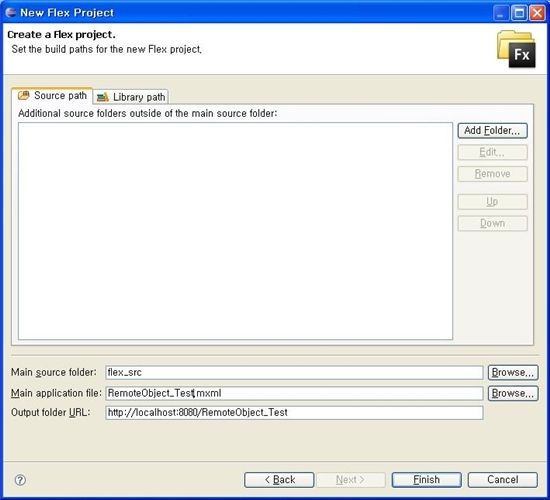
7. 그림을 참고로 자기에게 맞게 수정.
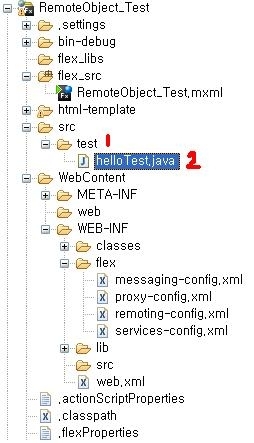
8. src 폴더에서 오른쪽 마우스 클릭(new-> Other -> java -> package)해서 test란 이름의 패키지 만들고 만든 test란 패키지에서 오른쪽 마우스 클릭(new-> Other -> )해서 java file 생성
자바파일 생성시 파일이름만 써주고 나머지는 설정 그대로 하고 마치면 됨.
----------------------------------------
-----------------------------------------------
9. 자바 내용 작성
------------------------------------------
package test;
public class helloTest {
public String
getStr(){
return "Welcome BlazeDS:
success!";
}
}
------------------------------------------------
10. WebContent/WEB-INF/flex/remote-config.xml 파일 수정
빨간색 글자가 추가된 부분임.
만약 위의 파일이 없다면 준비작업2에서 압축 푼 경로에서 import해온다.
(이유는 모르겠지만 나는 없어서...)
이클립스에서 xml여니까 트리구조로 나왔다. 오 신기 ㅡㅡ;
각 상위 태그에서 오른쪽 마우스 클릭해서 add child나 add attribute 메뉴로 아래와 같이
추가했다. 그게 어려우면 그냥 윈도우 탐색기로 경로 찾아가서 메모장이나 editplus
이용해서 수정해도 된다 ㅎㅎ
-----------------------------------------------------------------------------
<?xml version="1.0"
encoding="UTF-8"?>
<service id="remoting-service"
class="flex.messaging.services.RemotingService">
<adapters>
<adapter-definition id="java-object"
class="flex.messaging.services.remoting.adapters.JavaAdapter"
default="true"/>
</adapters>
<default-channels>
<channel ref="my-amf"/>
</default-channels>
<destination
id="blaze">
<properties>
<source>test.helloTest</source>
</properties>
</destination>
</service>
-----------------------------------------------------------------------------
11. RemoteObject_Test.mxml 파일에 작성
-----------------------------------------------------------------------------
<?xml version="1.0" encoding="utf-8"?>
<mx:Application xmlns:mx="http://www.adobe.com/2006/mxml" layout="absolute">
<mx:RemoteObject
id="ro" destination="blaze"
fault="faultHandler(event)">
<mx:method name="getStr"
result="resultHandler(event)"/>
</mx:RemoteObject>
<mx:Script>
<![CDATA[
import mx.rpc.remoting.mxml.RemoteObject;
import
mx.controls.Alert;
import
mx.rpc.events.ResultEvent;
import
mx.rpc.events.FaultEvent;
//에러가 났을 경우 이벤트 발생
private function
faultHandler(event:FaultEvent):void
{
Alert.show("error:
"+event.message.toString());
}
//제대로 실행 되었을 경우 이벤트 발생
private function
resultHandler(event:ResultEvent):void
{
Alert.show("result:
"+event.result.toString());
}
//버튼 클릭 후 RemoteObject Call
private function
remote_object_call():void
{
// remoteObjecc에서 java method
call
ro.getStr();
}
]]>
</mx:Script>
<mx:Button
label="service start" click="remote_object_call()" x="159"
y="127"/>
</mx:Application>
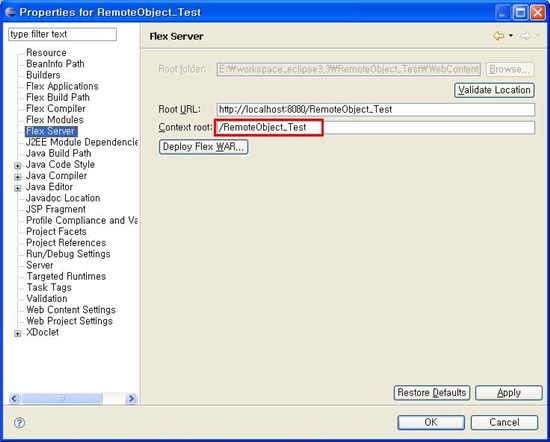
12. RemoteObject_Test 프로젝트 선택 후 오른쪽 마우스 클릭 해서 properies클릭
context root변경 -> 프로젝트명으로
13. 이클립스 도구 모음 window -> show view -> other -> server -> server
server 창안에서 마우스 오른쪽 클릭 New-> server 클릭
3번 그림과 같이 뜬다. 3번에서는 Installed Runtimes...버튼 클릭하는데 여기서는 그냥
사용할 서버 톰캣 5.5(아까 J2EE에서 만든 server) 선택 후 finish 버튼 클릭
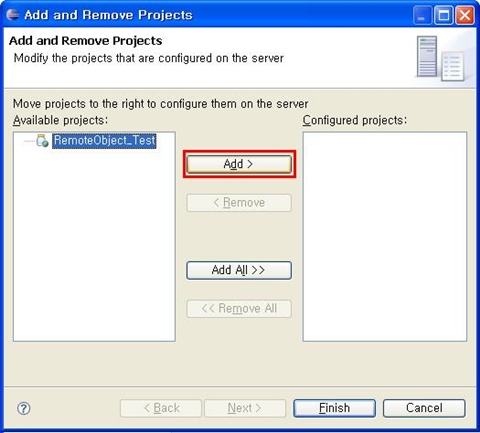
14. server창에 나타난 톰캣서버 선택 후 마우스 오른쪽 클릭 해서
Add and Remove Project... 선택
왼쪽 창에서 실행시킬 프로젝트 선택 후 add > 버튼 클릭 한 후 finish 버튼 클릭
15. 실행시킨다. 상단의 초록색 동그라미 모양의 재생버튼을 클릭해도 되고
최종 실행시킬 mxml파일 선택 후 마우스 오른쪽 버튼 클릭해서
Rus As-> 2.Flex Application 클릭해도 된다.
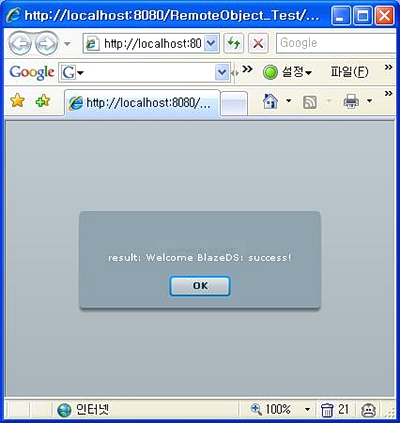
[결과 화면]
